If you're working with data, you'll often need to collect data from different sources and store it in various destinations. Whether your data transfer is a one-time task or a continuous process, you'll need ETL (extract, transform, and load) to connect your data sources.
Luckily for you, there are several great off-the-shelf ETL tools available.
However, sometimes you may come across unique data sources that aren't covered in your ETL tool. Or you may find yourself working with a limited budget.
In such instances, you may need to look for an alternative that can resolve your issues.
In this post, I'll go through the steps in getting started with Singer, a code-based ETL tool.
I'll demonstrate how to use Singer for your ETL requirements through a practical use case tutorial and discuss the pros and cons of using Singer in your data pipelines.
Singer: a customizable ETL tool
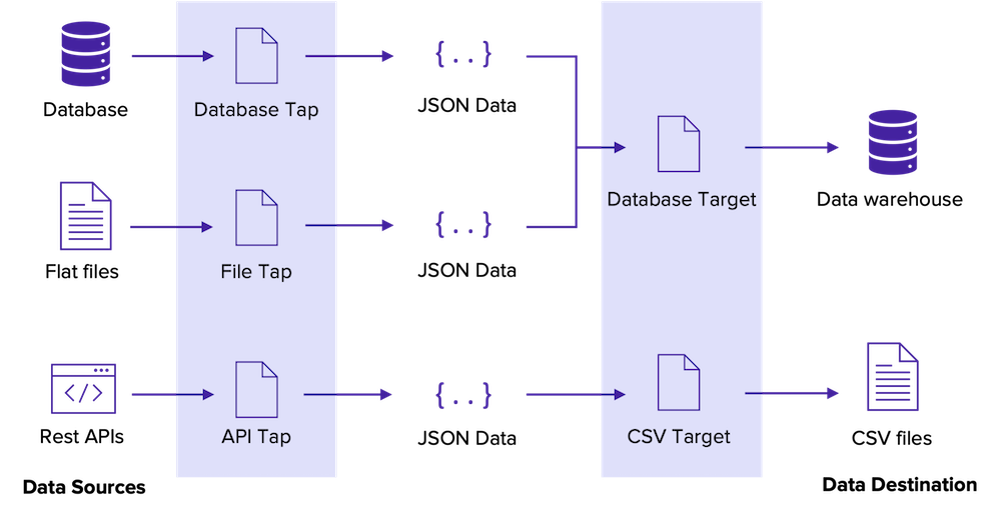
![]() Singer is an open-source ETL tool from Stitch that lets you write scripts to move data from your sources to their destinations. It also helps you build modular data pipelines, which are easier to maintain.
Singer is an open-source ETL tool from Stitch that lets you write scripts to move data from your sources to their destinations. It also helps you build modular data pipelines, which are easier to maintain.
Singer offers a simpler approach to unify your data manipulations, so there's no need to build your own program to handle data sources,
So, how does Singer handle data transfer between your sources and destinations?
ETL Pipeline in Singer
Singer has two types of scripts—taps and targets.
- A tap is a script, or a piece of code, that connects to your data sources and outputs the data in JSON format.
- A target script pipes these data streams from input sources and store them in your data destinations.
A number of taps and targets are readily available in Singer, so you can build data pipelines across various systems.
Popular taps available include MySQL, Google Sheets, Facebook Ads, Salesforce, and Amazon S3. You can then pipe data from these inputs to widely used targets such as Google BigQuery, PostgreSQL, Google Sheets, and CSV.
In addition, you can implement your own taps and targets if you need more integrations. Not only that, but because Singer uses JSON to manipulate data, you can define data schemas and rich data types to suit your requirements.
Getting started with Singer ETL
Being open source, Singer has a GitHub project where you can find the implementations of the taps and targets. However, if you were looking to download Singer, you might be surprised to find that there's no download option because Singer doesn't come as a single executable file.
Instead, Singer has a number of Python libraries that you can install based on your use case.
The utility library for Singer is known as singer-python, while the taps and targets have separate libraries to be installed on their own.
To start with Singer, you need the following to be installed on your system:
- Python 3: Since Singer is written in Python 3, make sure you have the correct version of Python installed on your machine.
- pip: Pip is a package manager for Python. It helps you install Python libraries according to your requirements. Usually, your Python installation would include pip. If it doesn't, you can read more about installing pip here.
Now that you have everything installed, let's try building a Singer data pipeline.
Building a Singer Data Pipeline: Step-by-Step Tutorial
Let's work with a simple use case as an example.
Imagine you have data in a MySQL database that you need to store in your PostgreSQL database.

Singer in Practice
Step 1: Set up the MySQL tap
We'll begin by setting up the tap for your data pipeline.
Singer has a MySQL tap that you can use to get data from your database.
Even in the most simple data pipeline, you'll need to have multiple taps and targets. Therefore, Singer recommends having a separate Python virtual environment for each of them; a virtual environment in Python has its own Python binary (bin directory).
If your taps and targets need different versions of the same Python package, you can install them separately on different virtual environments.
Create a virtual environment for the tap
First, on your command line/terminal, go to the directory where you want to keep the Singer script files.
Use the following command to create a virtual environment for your tap:
Note: The "mysql_tap" shown here is the name of your virtual environment, which you can change according to your requirement.
python3 -m venv mysql_tap
The above command will create a new directory called mysql_tap within your original directory. If you look through the directory, you'll see that this directory has a separate bin directory with python binary files.
Activate the virtual environment for the tap
Next, activate your virtual environment using the following command:
source mysql_tap/bin/activate
This command will modify your terminal to show the virtual environment you're currently working on.
When you run commands after activating, they'll be applicable to the chosen virtual environment.
Install the Singer tap
Now you're ready to install the Singer package for the MySQL tap. You can use the taps and targets section to find the package name for the tap you've chosen.
The following command will install the package within the mysql_tap directory you created in the first step:
pip install tap-mysql
However, to get configuration details specific for each tap or target, you may need to look through the help documents in each Git repository.
For instance, the MySQL tap repository contains detailed information about configuring the package.
Create config.json
Now, we'll create a config file to store the MySQL connection details.
In the bin of the mysql_tap directory, create a file named config.json and add the following snippet:
Note: Modify the below fields so that they contain the connection details to your MySQL instance.
{

  "host": "localhost",

  "port": "3306",

  "user": "root",

  "password": "password"

}
Run in discovery mode
Some Singer taps support discovery mode, which tells you about the data structures and streams supported by the tap.
Run the following command within the bin directory of mysql_tap to create a catalog.json file that will contain details about the databases in your MySQL instance:
tap-mysql --config config.json --discover > catalog.json
Create properties.json
Open the catalog.json file, and search in the file to find the JSON snippet for your database.
You'll find a snippet similar to the one below:
{

  "tap_stream_id": "test-db-employee",

  "table_name": "employee",

  "schema": { .. },

  "stream": "employee",

  "metadata": [ .. ]

}
Select the stream for the database you intend to use and save it in a file named properties.json.
Run the tap in sync mode
Now you can run the tap using the following command which will print the output as a JSON stream in the command line:
tap-mysql -c config.json --properties properties.json
Finally, run the deactivate command to deactivate the virtual environment for the MySQL tap.
Step 2: Set up the PostgreSQL target
Once you've set up the taps, you can configure a target to consume the JSON output from the tap.
Similar to the MySQL tap, you can use the following commands to set up the PostgreSQL target:
python3 -m venv postgresql_target

source postgresql_target/bin/activate

pip install singer-target-postgres
Add the following in the config.json and replace with the values for your database instance:
{

  "postgres_host": "localhost",

  "postgres_port": 5432,

  "postgres_database": "my_analytics",

  "postgres_username": "myuser",

  "postgres_password": "1234",

  "postgres_schema": "mytapname"

}
Step 3: Connect the tap and target
Now you have a tap and target configured for your data pipeline!
Finally, you're ready to move data from MySQL to a PostgreSQL database.
Singer offers a single-line command with a pipe operator to transfer data from your tap to target, as shown below:
mysql_tap/bin/tap-mysql -c mysql_tap/bin/config.json --properties mysql_tap/bin/properties.json |

    postgresql_target/bin/target-postgres -c postgresql_target/bin/config.json >> state.json
The above command will transfer your data from MySQL to PostgreSQL database.
Real life can be messy
As you may have realized, the above is a simple use case where things will go according to your plan. However, in practical scenarios, you may have to handle things like data insertions and scheduled updates.
Singer provides a configuration file called state.json to manage such scenarios, which you'll have to create and monitor when running data pipelines.
A better option for your ETL pipeline
Being a code-based tool, Singer has pros and cons; you'll have to handle each data source and target but, Singer provides a modular and customizable approach to building your ETL pipelines.
On the other hand, building your own data pipeline could be a tedious and error-prone task. As an open-source product, Singer has limited documentation on GitHub, which isn't comprehensive enough to help a new user to get started with the tool.
Furthermore, the user must manage data flow characteristics to minute details, such as data replication settings. Therefore, maintaining the data pipeline could be difficult in the long term.
If you're looking for a simpler, low-maintenance solution with easier configurations and automated integrations, Panoply could be for you.
You can try Panoply's cloud data platform for yourself for free, and start syncing data within minutes.


